Sunday, January 13, 2013

The Keel

Keel

The keel is the backbone of any boat or ship.  In traditional boat building it's the main structural element in which frames are attached.  It' also one of the first things built with everything else built around the keel.  The boat I'm building is not a traditional build boat but rather it's a hybrid.  In my case the keel is laid into the bulkhead after the hull already has its shape.  You've seen the keel temporarily installed in previous posts but now I'm ready to make it a permanent part of the boat especially since the temperature will finally be warm enough to actually use epoxy.  The temperature needs to stay above 60 degrees for at least 24 hours in order for epoxy to cure properly.  

Not so fast unfortunately.  I mentioned in an earlier post that the floor timbers continued to shrink after I had notched them for the keel (I had to take them all down and re-plane them before I installed them onto the bulkheads).  This forced me to raise (make the notches deeper) the keel around 3/16".  This should not pose and issues because a filler strake is used to bring the keel flush with the bottom of the hull after the hull planking is installed.  In a few instances I needed to lay in shims to bring the notches in the floor timbers down to the right level.  All of the notches in the floor timbers needed to be have at least minor adjustments.  

This figure shows thin laminations being glued into the bottom of the notches in order to maintain fairness of the keel. Three of the large floor timbers needed these laminations.  All required minor adjustments.
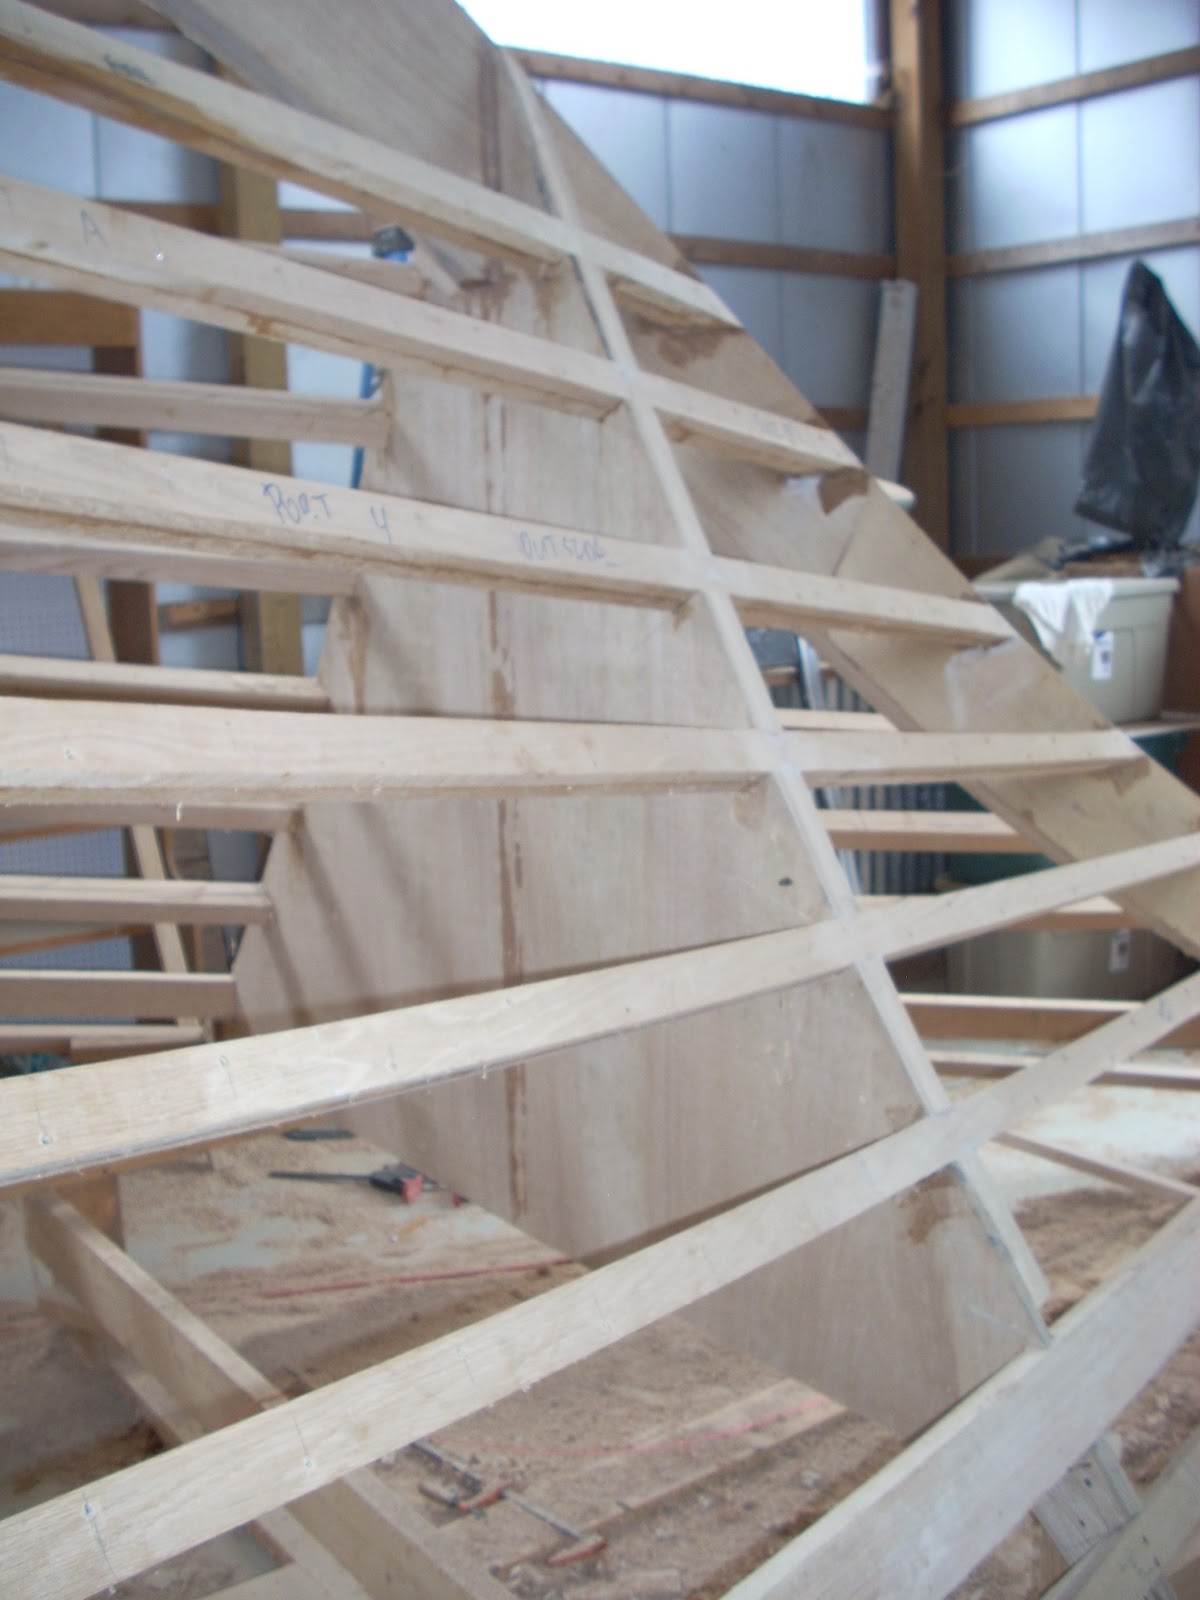
All the floor timbers back in place and ready for the keel.

Before I get to the keel, I used my shim making skills to fix a few other issues.  One of the longitudinal battens that terminated into the step was slightly recessed.  This was only apparent when I started to fare the bow by using thin battens bent onto the longitudinals.  I laminated a thin layer onto the batten and later I'll sand it down to shape.

Laminated a thin shim onto this longitudinal batten.  A short 1" X 2" board is used to apply even pressure to the shim to ensure that it is evenly bonded.  Wax paper is used to ensure that the clamping board can be removed after the repair is finished.

I decided to fix another issue while the temperature is nice.  A small 14 inch section of the third layer of the shear clamp became delaminated.  It's part of the shear clamp that was significantly shaped at the bow.  I clamped a piece of wood below the shear clamp where the repair was to be made so that the epoxy would not leak out of the bottom of the repair.  The separation in the shear clamp was filled with epoxy.  I then clamped the shear clamp tightly to ensure that the epoxy would be squeezed evenly throughout the delaminated section.  This is when I was reminded of what a liability cheap tools really are.  I figured 'C' clamps from Harbor Freight would work well enough.  I'd already bent a few but I had not broken one until now.  It's frustrating when your performing a critical task and your tools fail you.  The problem is that I need a very large number of 'C' clamps for this project and I figured I could get cheap ones.  There simple in function and made out of steal.  Actually, now I know they're cheap cast iron.  For the most part they have served their propose though.  I would recommend having a large number of cheap 'C' clamps for light clamping and a few good ones in critical situations.

Cheap 'C' clamps might not be worth the price.  I actually broke this 'C' clamp with hand pressure only.
The delamination of the shear clamp being fixed.  It looks complicated but it worked perfectly.
 Back to the repair. The repair looks awfully convoluted in the figure above but I was very pleased with the results.

After letting the epoxy set up overnight, I'm almost ready to install the first section of the keel.  A little sanding of repairs and I dry laid the first piece in place starting at the stern.  Drilled for the #10 2" silicon bronze screws and mixed up some epoxy.  I'll need a thickening agent for the epoxy so it will better fill small gaps.  The West epoxy, in its natural state, is very viscous and will run off a surface thats not flat.  There are various additives such as silica and micro spheres that thicken the epoxy and make it a better bonding agent.  I have just enough to make one batch of epoxy.  It turns out that I'm almost out of screws as well.  100 of these screws are $60 and the filler is around $30 but I'll have to order both from Jamestown Distributers.  I did, however, get that first piece (16 ft) installed.

Sunday, January 6, 2013

Buenas Notches

Many many notches later I finally finished the notches up to where the floor timbers start and then I ran out of wood for the longitudinal battens.  I would have  to save up some money which was getting a bit more difficult now that I have a new room mate (whom I married on October 7, 2012).  Nevertheless, I was able find enough money to get 500 board feet of lumber from Davie Ashley Sawmill in Elora, Tn. 

Stopping in Elora Tennessee for a quick drink after buying another load of white oak at Davie Ashley Sawmill.  This 16' trailer has paid for itself over and over again.  To the guy who literally took the next to the last corn dog out from under us at this convenience store (not pictured), you might want to avoid my wife for a while.  We actually ordered two corn dogs from one person behind the counter to have the guy behind us (yes he heard) order one from someone else who was quicker to the draw.  What is this world coming to when corn dogs and respect are in short supply.
I have at least one batten installed in all the notches up to the floor timbers.   You can see all the new battens that I made from the new load of wood waiting on the table in the foreground.
With this new load of wood I've changed the method of how I make the longitudinal battens.  Before I cut the wood to be as straight as possible and glued the battens together to be as straight as possible.  Now I'm ripping the lumber and following the natural curve of the wood.  The finished battens are then sorted by shape (straight, slight curve, radical curve, etc.)  I then select battens to fit the actual curves on the boat.  This has resulted in less waste and a much easier time fitting the battens into place at the cost of a little more time sorting and selecting the pieces.  I also gain increased strength since now the grain always carries true the entire length of the batten.  Before, I glued as manny battens as I could together.  Now, I can only glue up a few at a time and I've got to label and keep track of them.  I think its worth it though. There is less fighting to install them and I'm sure less internal stress in the final assembly.

The longitudinal battens finished up to the floor boards.  I've even faired the bulkhead to the hull contour in this photo.  Notice how the longitudinals flow smoothly into the stem.  This is no accident.
Back to the notches.  I've put together a series of photos that explains this grueling process.
After measuring for the approximate placement of the battens (they should be as evenly spaced as possible), a long batten is clamped in place.  There is a trade-off between the best placement of the batten and the natural tendency for how the wood bends.  This was more of an issue during the more radical transitions between the barrel shape of the mid-hull region and the bow.  The gentle curves near the keel seem to follow a natural bend for the wood which means I laid the hull out in a smart fashion or more likely I got lucky.
Clamping the batten in place on top of the bulkhead frame.  This bulkhead also has a 3" floor timber bonded to it.

It's important that the batten is clamped so that it lies flat against the bulkhead.  Of course it can only lie flat on one edge of the bulkhead because the edge is square and the batten does not fall normal to the bulkhead.  I had to be careful not to over clamp the battens because I need to measure the angle between the batten and bulkhead.


I use a square to project where the notch sides should be drawn.   Even this is not straight forward because the square will not lay flat against the frame and sit flush on the batten at the same time.

With the batten sitting naturally on top of the frame I measure the distance between the lowest part of the frame and the bottom of the batten.  This measurement plus two inches is what I will use for the depth of the notch from the bottom of the batten on both sides of the bulkhead.  Since the batten is at an angle to the bulkhead the final depth of the notch will actually be a little more (note the angle the rule makes to the batten and that the width measured at this angle is larger than the one inch thickness of the batten).  But this will get me close and I'll take the final measurements after I fit an actual batten into the notches.  


Marking the depth of the notch.

Notch drawn on the frame.

I've moved the clamp to the other side to mark this side.  The clamps often get in the way of marking the notches.

I start the cut for the sides of the notch with a hand saw.  I then use a Sawzall to cut most of the remaining side of the the notch.  I then finish with the hand saw.  I originally used the hand saw exclusively but I kept hitting screws hidden in the frames and after ruining 4 or 5 saws I switched to the Sawzall.  Ironically, the Sawzall is not really much faster than a sharp hand saw but the 4" floor timbers and frame combination is way too much for these short mitre saws and there is just no room for a long saw and once you hit a screw your done with that saw. 

The net step is to slice up the notches with a skill saw.  The skill saw is set to about 1 3/4" depth and I make 1/4" - 1/2" slices out of the notches.

A closeup of the slicing.

Some rough chisel work and the bulk of the material is cleared from the notches.

Notch cleared of the bulk of the material.

Using a hand saw, I make of cut in the center of the notch down to my depth lines on both sides of the frame.  I then can use a chisel and finish the notch.  Once a run of notches is cleaned out with the chisel I lay a temporary batten in place.  I note the places where it's too high and where the notch has the wrong angle.  Remember, I purposely designed the notches to be too high.  Now is where I measure the correct depth of the notches.  I also check to make sure the notches are not too tight.  A firm push or light hammer work should bring the batten flush to the bottom of the notch.  The most work is when the notches are too tight and I have to widen them.  This is painful chisel work especially where there are floor timbers.
A finished run of notches.  I hope there is not an air vent 2 meters wide at the end of this trench because my defenses are built around a large scale attack.
13/02/02
This is my nephew Joshua learning how to make the notches.  It sure is nice to get help occasionally.  This is the last run of notches on the starboard side.  My goal is to have the hull ready for "planking" this spring.
13/02/10

Finally finished all the notches on the starboard side of the hull.  I have 3 more runs of notches on the port side to go.  The last two runs notch through all the floor timbers and these take about two days worth of work to get right.  It's also difficult to work on the bottom of the hull.  There are few places to keep tools.  Floor timbers are close together which makes working difficult.  Also it's like working on top of a jungle gym with nothing but sharp edges.  Well, I'll be glad when the last three runs are complete.  Tonight I'm exhausted.     
13/02/17

I'll add a picture soon.  I've started the final three runs of notches on the port side.  I didn't get too far this weekend because it was the weekend that I started the vegetable garden.  The garden is tilled, marked, fenced against rabbits, and the cabbage and lettuce has been planted.  All the other plants have been started inside.  Next weekend I'm going to try my hand at snow boarding so there won't be any progress for a few weeks.  Wish me luck.

13/04/02

Okay, so no snow boarding in 45 degree weather while it's raining.  Progress on the boat has be relatively slow but has not stopped.  Almost done with all the notches.

A close up of the work on the notches on the port side of the hull.

All the notches are roughed out and most are clean.  I have not laid in the longitudinal battens to check alignment or depth.  That is the next step.  

The Mundane Business of Building a Boat

Study, study, study

A good deal of my time is spent studying the plans and I've read through the instructions countless times.  You've really got to be familiar with the a great deal of the specifics before you even cut your first piece of wood.  So much of what you do will impact every stage of the construction it's imperative that you really understand what you are doing (See the section on building the transom).  The good news is that often a stage of construction will last a great deal of time and it's not necessary to have your nose in them all the time.  I spent a year on longitudinal battens and I'm still not done with them.  There was little need to consult the plans during this stage (well not often at least).  I did however read through the instructions a few times.  A few weeks ago I sat down to study the blue prints again because I'm about to lay in the keel permanently and I do not want to make any mistakes.  I do not know why, but in the two years I've been working with these plans they have faded and the paper has yellowed.  Parts are completely unreadable especially on sheet 4 of 6 (the most referenced page).  I realized that I should have had these sheets copied the day I got them and kept the originals sealed.  Now, blue prints are not used anymore.  Black line printers are the norm.  I asked a friend who's father owns a copy store specializing in plans to try to salvage what I have.  He was not able to bring out much of the faded lines but the black line will be much more durable and not subject to fading.  I still have one sheet that I'm having difficulty reading. 
Sheet 4 of 6.  These are actual blue prints so all the black that you see is where I've inked in what was faded.  There is still some missing information in the upper right that I can not recreate.  Luckily its just the dolphin striker and mounts that are difficult to read and I will not need this information for awhile.  Reading glassed, architect rule and an ink pen are the tools used for this work.

 I asked Glen-L Marine to send me new copies but they want $275.00 for a replacement set even though I do not need the large pattern sheets.  A local copy shop typically charges $5.50 a sheet not that I expected Glen-L to be that cheap.  I've asked Glen-L Marine to price me copies per sheet but I expect they won't do it [Actually after a bit of discussion they did much better than that and sent me the sheet I needed for free.  Go Glen-L Marine].  I realize that $275 is a measly amount of money compared to what the boat will actually cost but I put it in terms of what I could buy with that money such as 5 gallons of West epoxy.  Besides I'm still recovering from my wedding and honeymoon.  My temporary solution is to go over the plans with an ink pen filling in what I can.  I was amazed at what I was able to bring back but I'm still missing enough that I'll have to buy replacement plans.  The lesson is: make copies of your plans before you start.  Ironically, I made multiple copies of the instructions when I bought the plans because they were on old yellowed paper and they were fragile.  I wish I had thought to make copies of the plans.

I will say that I was able to get a good revue of the plans while retracing text and lines.  I actually did this on several sheets but none to the extent of sheet 4 of 6.  In reviewing the plans I realized that there is a floor timber on bulkhead 'J' that I had not fabricated yet.  It's only a 2" floor board and not very large but, hey, it is important.  The forward floor board supports the Vee berth as well as strengthens the joint where the stem, bitts and bulkhead come together.  I will make this piece out of two laminations of 5/4' stock that was too short to use as longitudinal battens.  Just goes to show you that you can look at the plans a hundred times and still see something you missed.  My advice is to look at them 200 times.