June, 10
My next two goals are:
One, finish up the chain locker. Two, finish up the black water (holding tanks) and fresh water tanks with rough plumbing.
So I've been buying through hulls, seacocks, elbows, vented loops and deck hardware. I also have a pump to empty the black water tanks at sea. I went with Groco for everything below the waterline. Bronze with flanges. With quite a bit of searching I found some good deals. For the vented loops, I went with Marelon from Forespar. Failure in a vented loop is unlikely to sink my boat and will be noticed fairly quickly since they are above the waterline. I've also decided that the 'ceilings' need to be installed first with cutaways for the seacocks. This will present a nice clean surface to mount all the plumbing behind and above the cabinetry. The ceilings are just the inner walls of the hull and I've chosen southern yellow pine tongue and groove with a nice bead. I've found some very nice clear stuff from Home Depot of all places. Actually, it's the nicest stuff I've found and you'll never hear me promoting Home Depot for anything else.
Other considerations: I've purchased some sending units and gages for the potable water tanks but I do not have a solution for the black water tanks. I'm thinking visual inspection might be the best approach. The combination of what is in the tank (salt water and poo) does not bode well for and device in situ and the remote sensing devices are terribly expensive. I'm still thinking on that.
Further considerations: Wire runs for the pump out pump, fresh water pump, and sump pump will have to be made as well.
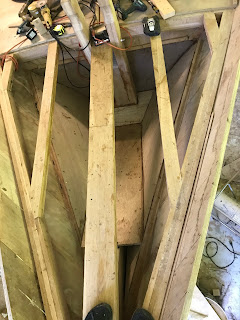
Most of the pieces for the chain locker have been fabricated and fitted with the exception of the bottom floor which is actually rather small. One complication is that I have to have a drain for this part. I found an extra long 3/4" Groco through hull fitting that should make it from the hull right up into the bottom of the chain locker without any additional fittings. This is important because once it is installed there will be no access for maintenance. When I glass the chain locker, I'll glass in the drain at the same time. I should end up with a large, sealed chain locker above the water line with a nice drain. When in port, I'll be able to wash the chain down with fresh water.
June 11,
I've been able to put some more time in on the chain locker. This space is proving to be very difficult to make. I'm almost there though. The floor is 3/4" (19mm) plywood and must be curved around the stem. The sides are 1/4" (7mm) plywood. I will fiberglass the entire area to make it water tight and strong enough to take the abuse of the chain.
 |
| I finally got that piece over the stem to fit. I just have to put in the little trapezoid in the back. |
 |
| Using the first piece that didn't quite fit correctly, I was able to make one that fit very tight and was very level. |
 |
| An overall view of the chain locker. The back panels and bollards made earlier will fit through the trapezoid floor so I'm not quite done yet. |
 |
| Everything is cut out and fit into place. |
 |
| The chain locker epoxied and screwed in place. I have to fill all those screw holes now. |
June 24
Taking a break from the chain locker (It's almost ready to glass) and fitting some more ceiling in the main salon. Once fitted, I'll take it all down to be primed and have a first coat of paint. All the ceilings really need to go in before I make much more progress. I'll need to do a little rough wiring for the pumps but all of the plumbing needs to go on top of the ceiling and under the cabinetry.
I need to get those ceilings down to below the floor boards (not yet installed), run wiring to the major pumps (shower, waste, fresh water), and lay in the rough plumbing with the waste through hull. Then the under cabinet sole can go in. I've decided to use the 3/4" plywood as the sole under the cabinetry and I'm hoping to use quarter-sawn southern yellow pine for the companion ways.
June 30,
 |
| The port side ceiling fitted and temporarily installed. |


