Monday, June 5, 2023

June 2023

June 3,

Working on interior cabinetry now that all the rough plumbing is installed. This is new territory for me. I know I will make a few mistakes along the way so the idea is just to take my time and minimize the carnage. So far so good. A few miss cuts but nothing that could not be quickly remade.  


Setting up the cabinet front for the port cabin. There are only 3 drawers and 3 cabinets on this one. The far left will have a lavatory.


Prototype drawer. This is going to be our basic drawer design except that the grain of the plywood sides is going to be rotated 90 degrees. The slots cut for the bottom create too much splintering when cross cut. 

Drawer openings with HDPE guides for smooth operation.

Stile and rail cabinet doors made in bulk. Set up takes a long time so you better make a lot of parts at once.

Rail and stile door for the oil skin locker.  It is made exactly like the cabinet doors.

All the parts laid out.


I thought cutting the stile would be difficult because it is cut on the end grain.  With the fence set at the stile cutter roller you can make a nice approach and even use two passes to cut the full depth. I used a "T" gauge (not shown) that I made with a backing piece to prevent break out. I'll include a picture of the method later.

Front of port berth cabinet glued together and installed.


Finish cut the companion way and got the trim that covers the plywood edges installed. The piece at the top actually follows the curvature of the beam there but it is subtle... not subtle to build and install, just subtle on the eye.


Complicated cuts for the trim that lines the companion way.

June 10,
Rough framing of port berth complete.

Rough framing of starboard berth completed.

Both "cabins" shown together. The on on the right (port) will have a dividing wall with a sliding door. There will also be a private lavatory to the right of the doorway and a private entrance to a shower and head that is shared with the vee berth forward. The one on the right will remain exposed and have a curtain that can be closed although it will impinge on the walkway a bit. No private access to a shower, lavatory, or head. That is the difference between first class and coach.

June 19,


Cabinet front for the private lavatory in the port cabin. The is a drawer on the bottom and the top will be a fold-out seat with storage inside.

Dry fitting the lavatory cabinet front.

Got the sides installed. This is actually a removable piece so that there is access to the shower sump below.

Inside the lavatory cabinet. The water lines coming up from the bilge and the drain pipe gravity feeding into the holding tank. The notch for the drain pipe is large so that the entire cabinet can be lifted off hanger bolts for access to the shower sump.  


I'm laying this floor in our families cabin in North Carolina. It's hickory and has a lot of character. I'm thinking of using this same flooring for the sole.  What do you guys think?

This lavatory cabinet is removable in order to get to plumbing that runs underneath it. I might as well work on it on a nice bench. Well, once I have the shape established. The floor actually is at an angle to the natural vertical. 

All the cabinetry installed in the two cabins midship. I've put a drawer in below the seat (not shown) that will fold down from the lavatory cabinet. 


Monday, May 8, 2023

May 2023

 May 6,

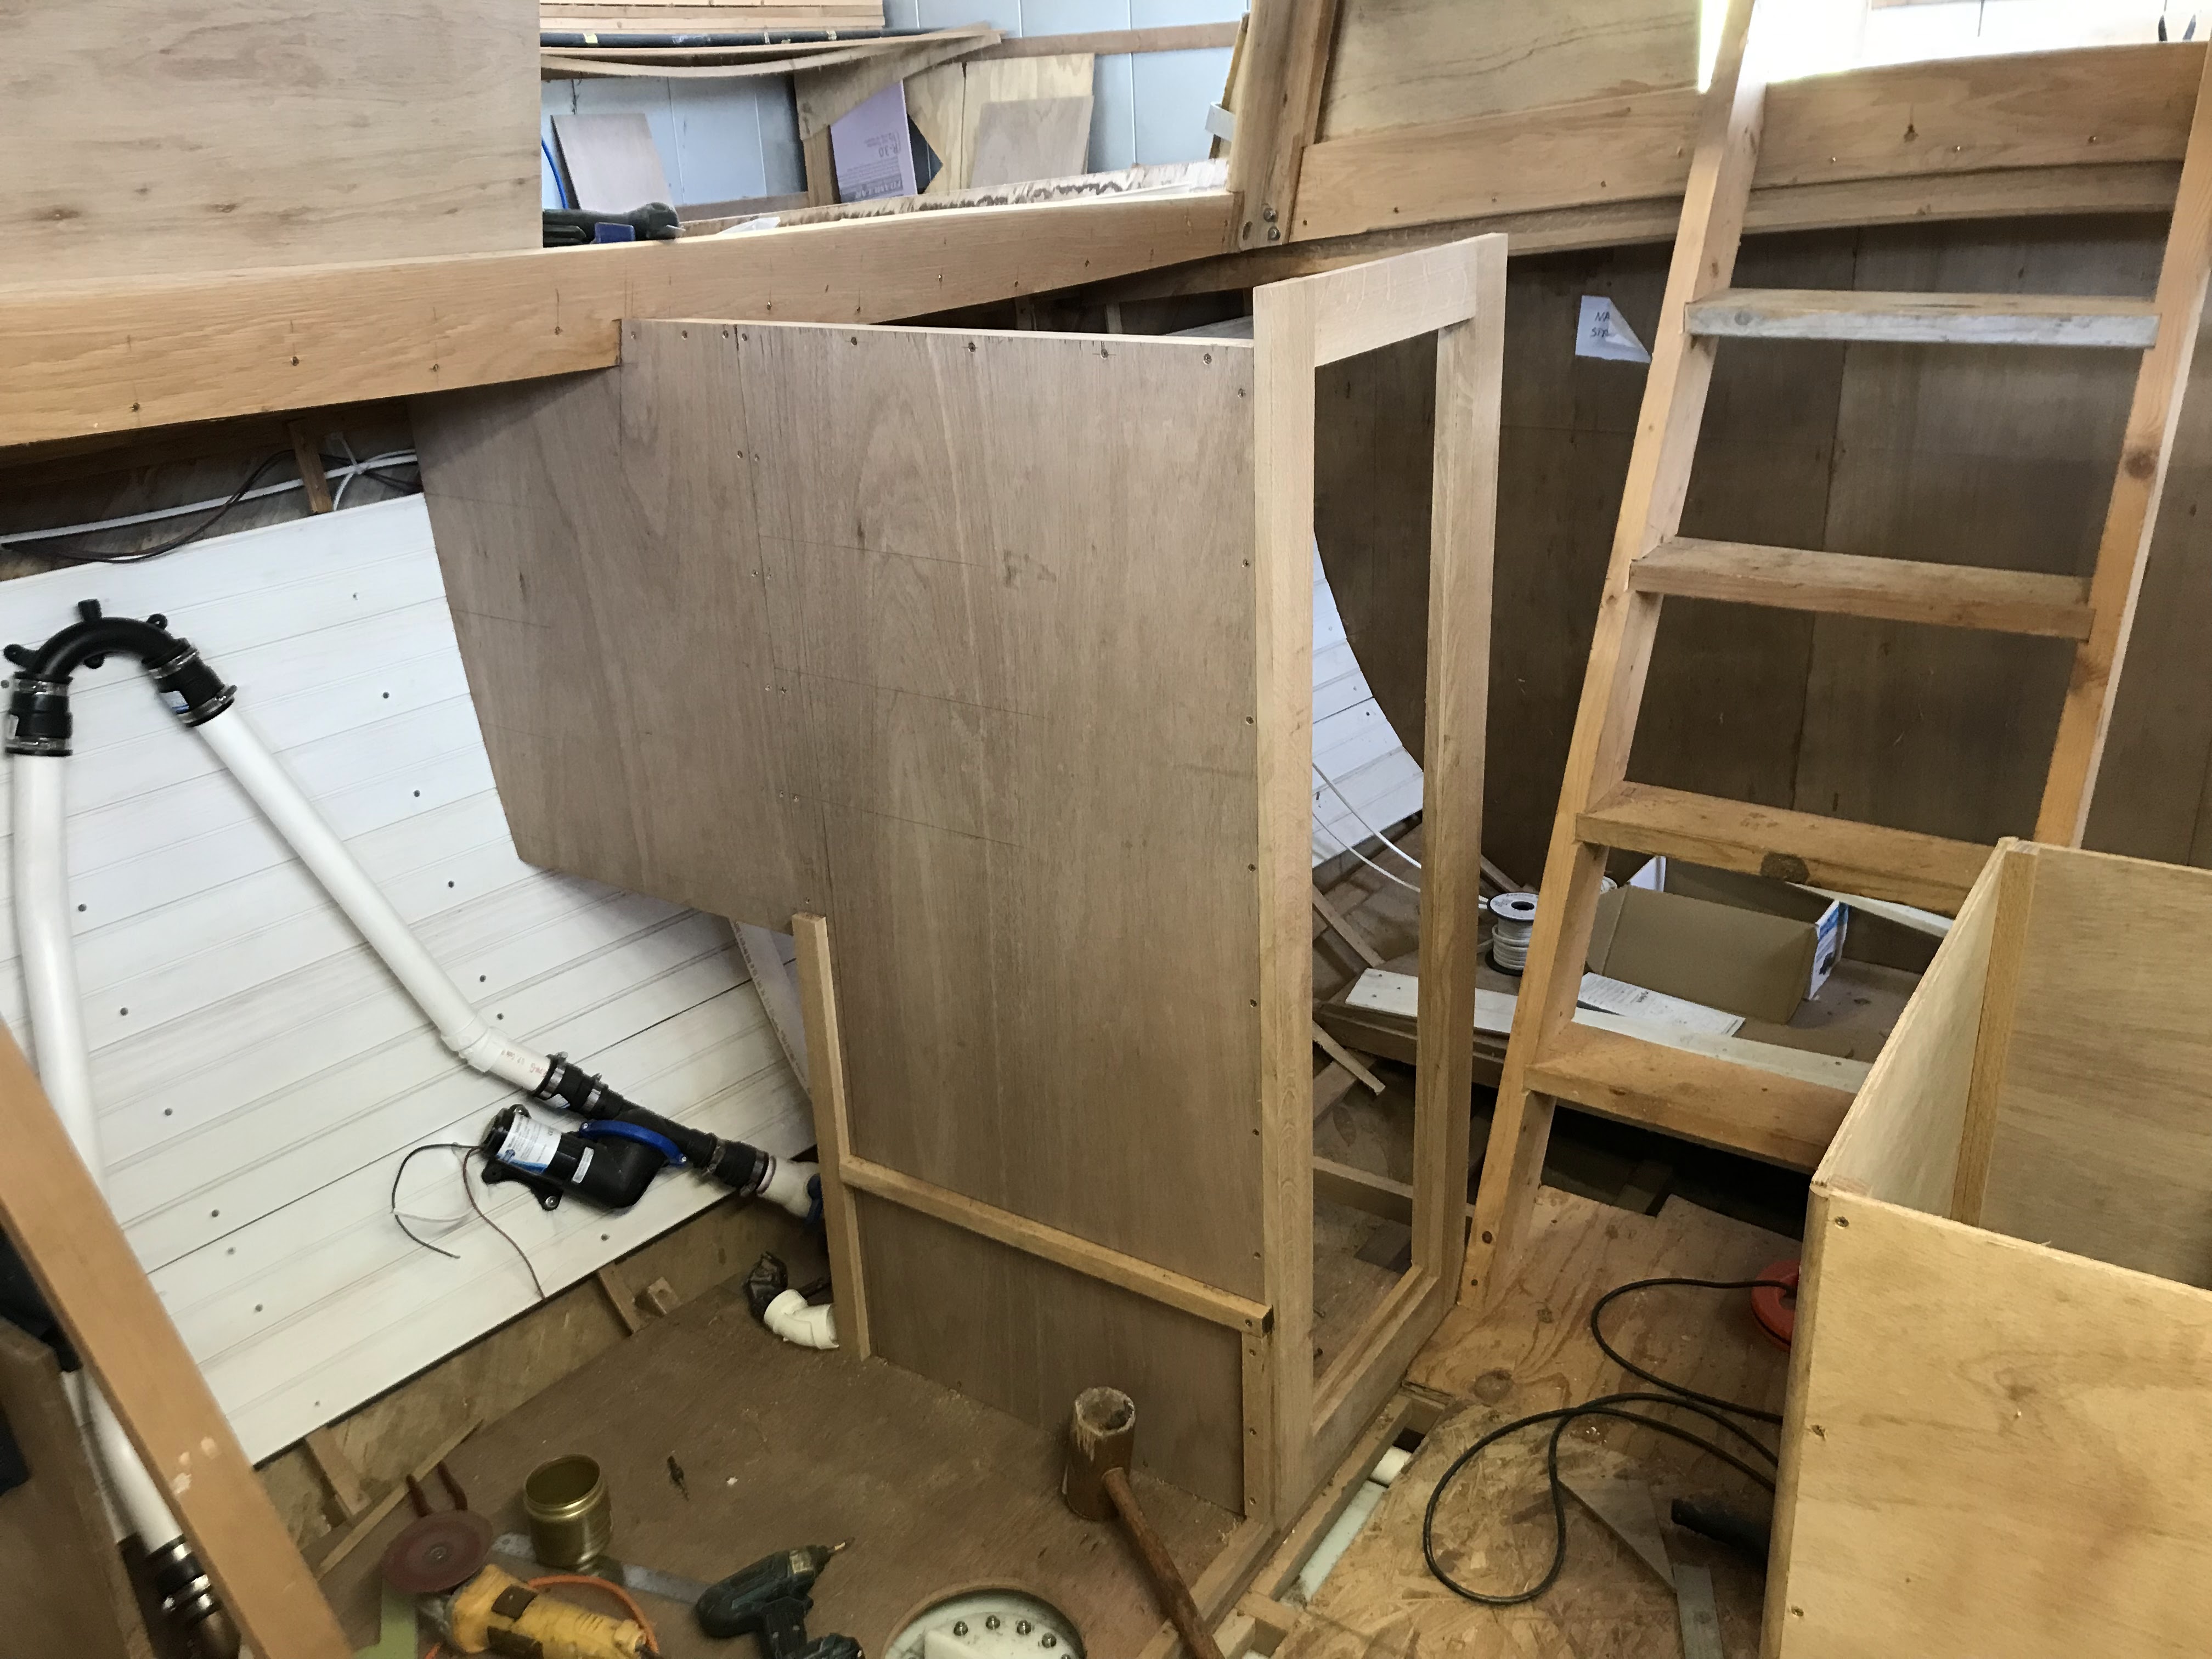
I finished the plumbing runs to the shower sump and hooked it up to the holding tank. I finished installing the ceiling on the port side and installed the joists for the sole. I also worked out (mostly) the runs for the hot and cold water runs.

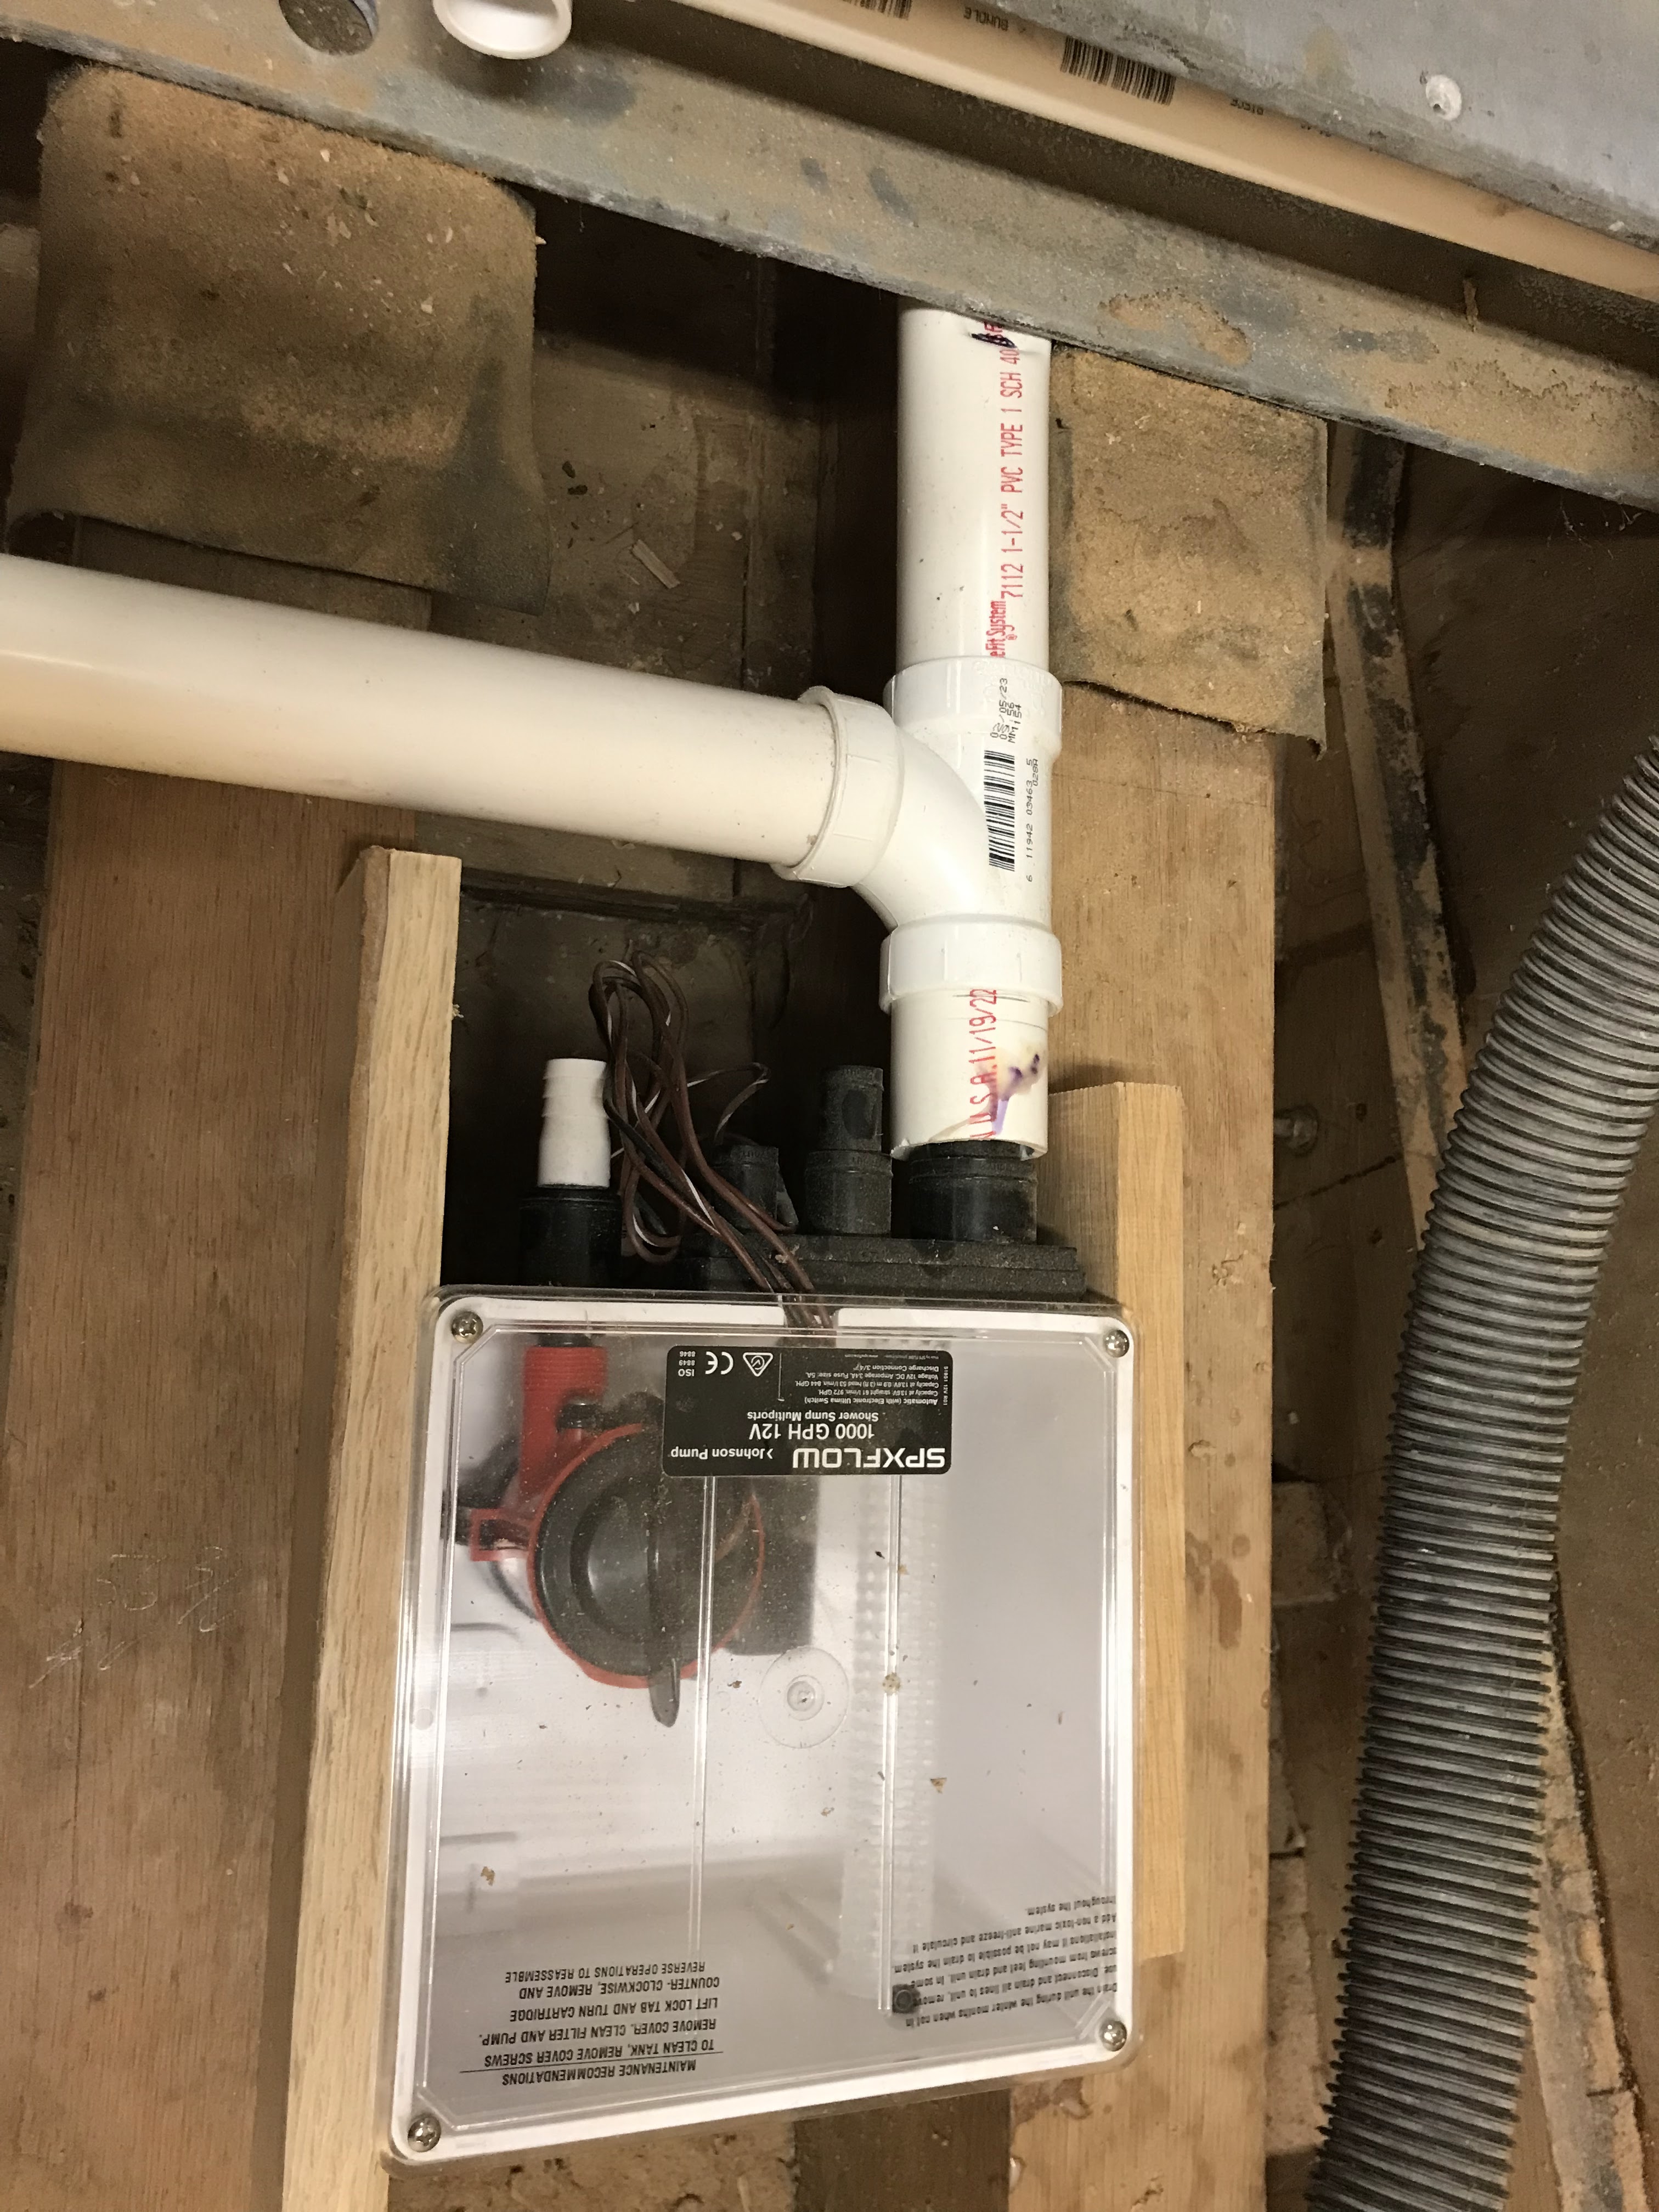
The shower sump is connected at last. The 1.5" PVC runs to both shower drains and the Vet berth lavatory drain. The grey water is pumped from the sump to thorough a 1" PVC pipe to the holding tanks. The fitting at the top of the page is a one-way valve or back flow preventer. I also added a ball valve right before the pipe enters the holding tank. I removed the cheap stainless pipe clamps and will replace those with high quality clamps.

May 10,

Running the PEX for hot and cold water. I sure do love how PEX is colored. 

A close up of the run from the galley sink where the hot water heater is to the port cabin lavatory (left, center), the starboard lavatory and shower (right, bottom), and the fee berth shower and lavatory (right, middle).

Under the galley counter is the propane powered hot water heater. I've used this brand of hot water heater in a cabin for 15 years. Very reliable and uses two "D" celled batteries for ignition. It is ventless and very efficient. I might have to put a heat shield under the counter above the exhaust but I doubt it. I'll check temperatures when I fist power it up. 3/4" PEX from the tank to the hot water heater. 3/4" PEX from the hot water heater to where the first branch is in the line. 1/2" PEX will come off the hot water heater to the galley sink.

Hot water heater connected with Tees heading toward galley sink. 1/5" drain is for galley sink as well.


We got the bead board cut into the Vee berth. No easy task.  The 3/4" boards need a good twist and curve to fit.

Removed, primed both sides, and reinstalled.

Finally hooked up the starboard head run to the holding tanks.  Notice the ball valve. Every connection to the holding tank has a ball valve. The tank is vented via a 3/8" braided clear hose. I will use a fuel tank vent through the hull near the scuppers. 


Port head run tying into the port holding tank with a sanitary tee to run to the galley sink. Venting of the tank is through the 3/8" nipple on top that will have a hose eventually.

The starboard head run branching to the starboard lavatory. The blocks of wood behind the 1..5" PVC supports the forced bend in the plumbing until the PVC glue is cured. Once removed, the PVC assumes a gentle bend. 

Port head run not quite finished.


May 28,

Working on finishing up the rough plumbing and adding all the tank vents so the cabinetry can be finished.


Installed the fresh water sending unit (upper right). Removing the access panel to the fresh water tank was really difficult so I added a tee handle. It is so easy now. I still have to add a ground wire to the sender unit so I'm not quite ready to bolt the access panel down yet. The port side is similar.

This is the fresh water vent. There is one on each side. The tape covers a 3/8" nipple where a hose will attached and vent the fresh water tanks under the settee. The blackwater tanks are vented through the hull near the scuppers to avoid odors. The port side is similar.

Fitting the cabinet front for the starboard berth. This is a trial fitting before it is glued up on a work bench.

It fit, so it is being glued up and screwed together from the rear. Yes, workbench is a mess. If you're working, there is not time for tidiness. 

Planing the bevel on the port cabin sole that will be under the berth. 

Measuring for the cut-outs for the plumbing and hull frame in the upper left corner.

A nice fit. I've also extended the supply lines to the port cabin lavatory  (right). 

Cabinet front tacked into place. Three nice sized drawers and three nice sized cabinets.

Friday, April 14, 2023

April, 2023

 April, 10

Construction on the interior continues. I am currently trying to get all the plumbing to the showers and vanities hooked up which means finishing the shower pans. The pans will be glassed smooth and painted white.  I'll extend the glass up and under the heads to make cleaning easy.

Looking down on the shower drain.  I have used a router to make a cut-out for a standard (US) shower drain and screen.  The corners of the shower are angled for easy clean-up. Bottom right is the door jamb on the hinge side. So the door will open out.

Jambs completed on the starboard shower. Right section is not epoxied yet. I still need to finish the door jambs for the walk through from the salon to the cabin area. That jamb will also support the narrow wall to the right of the shower. 

Plumbing run from (foreground) the port forward vanity to the port shower drain to a Tee that goes (right) to the shower sump and (left) on to the starboard shower. Sanitary Tees are being used throughout. 

A close up of the shower sump with rough connection. What if there is not enough room to get the pipe under the "H" beam? Water will not flow uphill. PVC can be heat shaped.


I heated the PVC pipe with a hot air gun and clamped a block on the top once the PVC got a little soft. This method retains most of the cross section area of the pipe while allowing it to fit under the steel "H" beam without a dip in the pipe that will collect debris over time. 

April, 23
I have temporarily placed boards that define the cabinetry associated with the starboard berth. Since the floor falls aft, the bottom horizontal board is actually tapered so the cabinets and berth will be level. The drain for the starboard shower is dry installed (needs to be glued) to make sure everything fits correctly and gravity feeds to the shower sump pump. 
This is the starboard cabin. Left is the berth with cabinetry below. There will be three drawers across the top with three cabinets below each drawer. The drawers will be deep. The two cabinets on the right will have a common shelf in the middle. 

April 29,30
Half lap joints work very well for the cabinet fronts. I used a router for the pockets and a dado blade on the radial arm saw for the half lap. I curved the corners with an end sander so I don't have to square the pockets with a chisel. Saves a lot of work and it doesn't have to be perfect because you can't see that side.

This is the back side of the cabinet front lightly set together to check tolerances and fit. I'll glue all this up and screw it together with 1/2" stainless screws from the back.


Tuesday, March 7, 2023

March 2023

 March 5,

More work on the interior cabinetry. I've worked out cabinet doors a bit more.  I still need to experiment with the basket weave panels.  More on that later.

The countertop, settees, and crew berths are all constructed of Meranti plywood.  All vertical pieces are 3/8" (9mm) and all horizontal (seat and berth floor) are 1/2" (12mm). All joints for the plywood are build on white oak frames. Never screw plywood directly to plywood end grain. Almost all of the oak frames are  roughly 1"x1" (some are 1"x2") and are made from the unused waste from fabricating the longitudinals and other framing structures. I don't throw any wood away. 

The opening to the left of the stair will be the oilskin locker.  Those stairs will actually be a bit steeper allowing passage between them and the locker to access the chart table beyond.  


Fitting a bulkhead that will become a recessed lavatory for the starboard side head. 

The starboard side settee roughed together against the fitted bulkhead from above.  You can see a small space between the ceiling and the back of the bulkhead.  Four foot wide plywood was not quite wide enough.  Turns out that space will allow the removal of a few of the ceiling (wall) boards to access electrical runs. It's also back in a cabinet and I'll install a fitted panel to hide the gap.

March 14, 
I'm technically off work this week so I plan on making some progress on the boat.  Saying that, I'm actually at work today covering some important meetings that I have to attend.  A good time for updates.

The crew berth gets the access cut out and trim fitted.  The trim is just rough fit and needs some tweaking and a lot of sanding but I think it will look great eventually. The vented loop will have an easy access panel over it for aesthetics. 


Sometime in March,

I have moved up the starboard side and I'm working on the starboard head and cabin floor under the cabinetry just like the salon. Everything is in place and it is time to glass the shower stall floors and get all the plumbing in for the vanities and showers.  

Tuesday, February 14, 2023

February 2023

 February 12,

Starting on some cabinetry. 

Avoiding sharp corners while providing backing for joints.

Fitting the first cabinet face.  This one will fit the curvature of the hull and provide a base for the Settee and galley.
February 19,

We made a lot of progress this weekend. The cabinetry is going in fairly quickly.  I've decided to just use screws everywhere so that it can be removed to reach areas for maintenance. That actually makes putting everything together much faster. All vertical cabinet panels are 3/8" Meranti plywood while the horizontal panels are all 1/2" Meranti plywood.  I've got so much scrap white oak lying around, some in 15' lengths from cutting the longitudinals, that I am using for backing for joints and supports for the cabinetry. 
This is the settee being built.  There will be plenty of storage.

In the foreground is the galley sink cabinet and in the background you can see the settee and a crew berth behind the settee.  The crew berth will have a cutout in the middle to make it easier to craw in and out but still have a barrier to keep the crew member in the berth in rough weather. The galley sink cabinet will have a handhold along the walkway that converts to a backsplash as it round the back corner. The settee will have a trim piece along the front to hold the cushions in place and lockers under the cushions to access the storage space.