Floor Timbers
The floor timbers are large oak timbers that sit in the bottom of the hull. Every bulkhead has one bolted to it plus there are several that float between bulkheads mid ship. The ones that float are held in place by the longitudinal battens and are bolted to the keel. They are called floor timbers because the sole is typically attached to them but they exist to hold the 12,400 pound ballast keel to the bottom of the boat. This ballast keel acts as a counterpoint to the force the wind places on the sails. Extending four of five feet from the bottom of the boat the keel and the hull need to be rigid. Long stainless steel bolts will pass through the ballast keel and into these floor timbers. Where the ballast keel is located there is a floor timber every 12" or so. The floor timbers that support the ballast keel are 4" thick with some roughly 14" wide. The others that simply mount to the bulkheads are 3" thick and no more than 10" wide. Their lengths vary from 6 to 12 feet. Naturally I had to get these timbers custom cut which means green lumber. Luckily, I ordered the lumber (from Davie Ashley Sawmill in Elora, Tn) in the fall which means that the trees had lost their sap when cut. This speeds up the seasoning time for the lumber. Nevertheless, I would have to wait a year before I could make the floor boards. I didn't wait a year, I waited about six months. I bought a moisture meter which was suppose to tell me when the wood was dry enough to work. What it told me was when the outer half inch was dry enough to work. Making a long story short, before bonding the timbers permanently to the bulkheads I took them back down and re-planed them flat so that they would mate flush to the bulkheads.
 |
| Leaving Davie Ashley Sawmill in Elora Tennessee. Thats a 16 foot trailer. |
After the timbers were mostly seasoned, I made patterns from the high side of the bulkheads. This meant that I marked where the bulkhead top would be on what would be the widest side of the bulkhead. Since all the bulkheads would eventually be tapered to follow the curve of the hull, there would always be one side a little longer than the other. I needed to err on the side of wide when making these floor timbers. I ended up with a pattern for each bulkhead. When cutting out the floating floor timbers, I would use the largest bulkhead pattern in that area. Few of the timbers were narrow enough to fit through the table top planer (12"). I planed the ones I could and precut the ones I thought would squeeze through after cutting to size. The very wide ones I smoothed down with the hand power planer. This was very time consuming. I actually finished them with a hand planer to knock off the high spots. They were all temporarily put in place and marked for the keel notches. They were reinstalled and the keel notches were tweaked with hand saw and chisel.
All the floating floor timbers needed to be shaped to the hull before the battens were installed. There was no way I was going to be able to keep the hull fair while installing the battens any other way. I came up with a clever scheme for making this happen. I screwed 1" blocks of wood to a long batten with the same spacing as the bulkheads. I then clamped the batten to the bottom of the bulkheads with the one inch blocks between the bulkheads and the batten. If the floor timbers got in the way, I rough cut them down so that they were the correct size within that one inch margin. The batten made a smooth spline that simulated the hull shape except one inch below the actual hull (or above the hull line depending on perspective). I was then able to measure down one inch and mark both sides of the floor timber (actually I used a 1" marking block). I repeated this procedure from one side of the floor timber to the other marking every few inches. I then nailed brads where the marks were and bent a thin batten over the nails clamping one side to the closes longitudinal batten. The thin batten created a fair line between the nails/marks. This was the hull line for that side of the floor timber. Once repeated on the other side of the floor timber, I used the hand held power planer to remove material down to the lines.
 |
| Floor timbers with keel notches loosely where they will later be installed. The ones grouped together are the floating floor timbers. |
| The batten with 1" block spacers that was used to shape the floor timbers. Each 1" block would sit on top (bottom of the boat) of a bulkhead. |
 |
| The floor timbers temporarily in place with one of four layers of the keel laid in the notch. |
 |
| Another view of the floor boards. These have been shaped to the contour of the hull using the method described above. |
 |
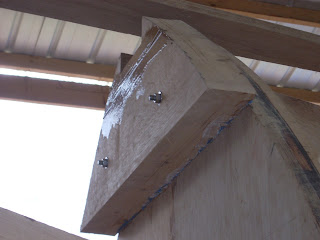
| First floor timber bolted and epoxied in place. This small floor timber only merited two 6" X 3/8" stainless steel bolts. |
 |
| Second floor timber bolted and epoxied in place. Most floor timber merit four 6" X 3/8" stainless steel bolts. |

No comments:
Post a Comment
Your feedback is very much appreciated.